Building on DID Connect

Introduction#
In this article, you will learn how to set up a dapp with DID Connect, which should work with DID Wallet
Prerequisites#
- Skills required: developers with a certain foundation in developing React + Express + Typescript applications
- Operating System: It is recommended to use MacOS, and Linux for development, while Windows needs
- Environment: Node.js >= 20
Getting Started#
Preparation#
- Install DID Wallet: please refer to
- Install Node.js: please refer to
- Install Blocklet CLI: Please refer to
- Complete email verification and blocklet store setup
- Get email verification certificate: https://test.store.blocklet.dev/.well-known/service/kyc/email
- Get TBA token for future use: https://faucet.abtnetwork.io/
- Get your developer passport on blocklet store: https://test.store.blocklet.dev/join
- Connect blocklet store and your development environment:
blocklet connecthttps://test.store.blocklet.dev/
- Get email verification certificate: https://test.store.blocklet.dev/.well-known/service/kyc/email
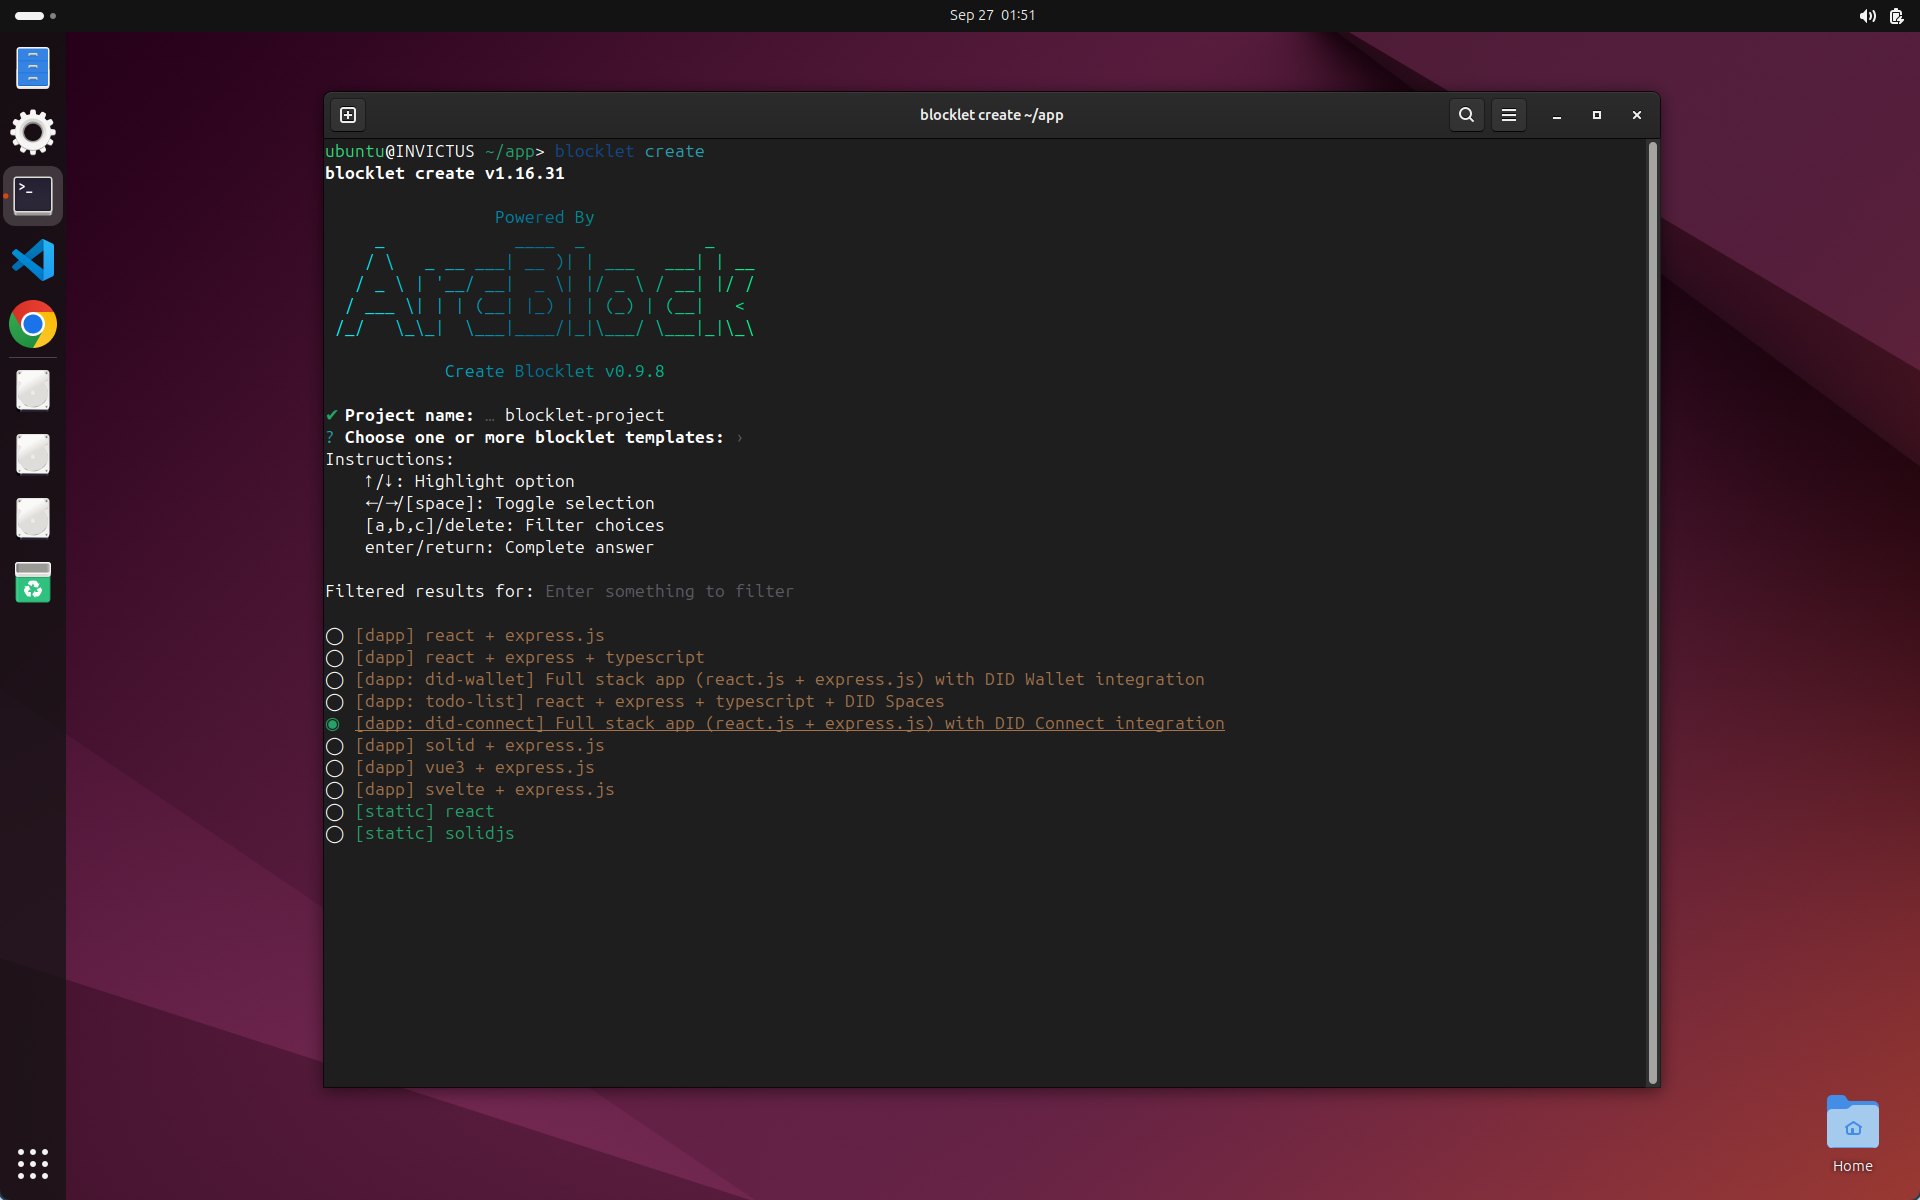
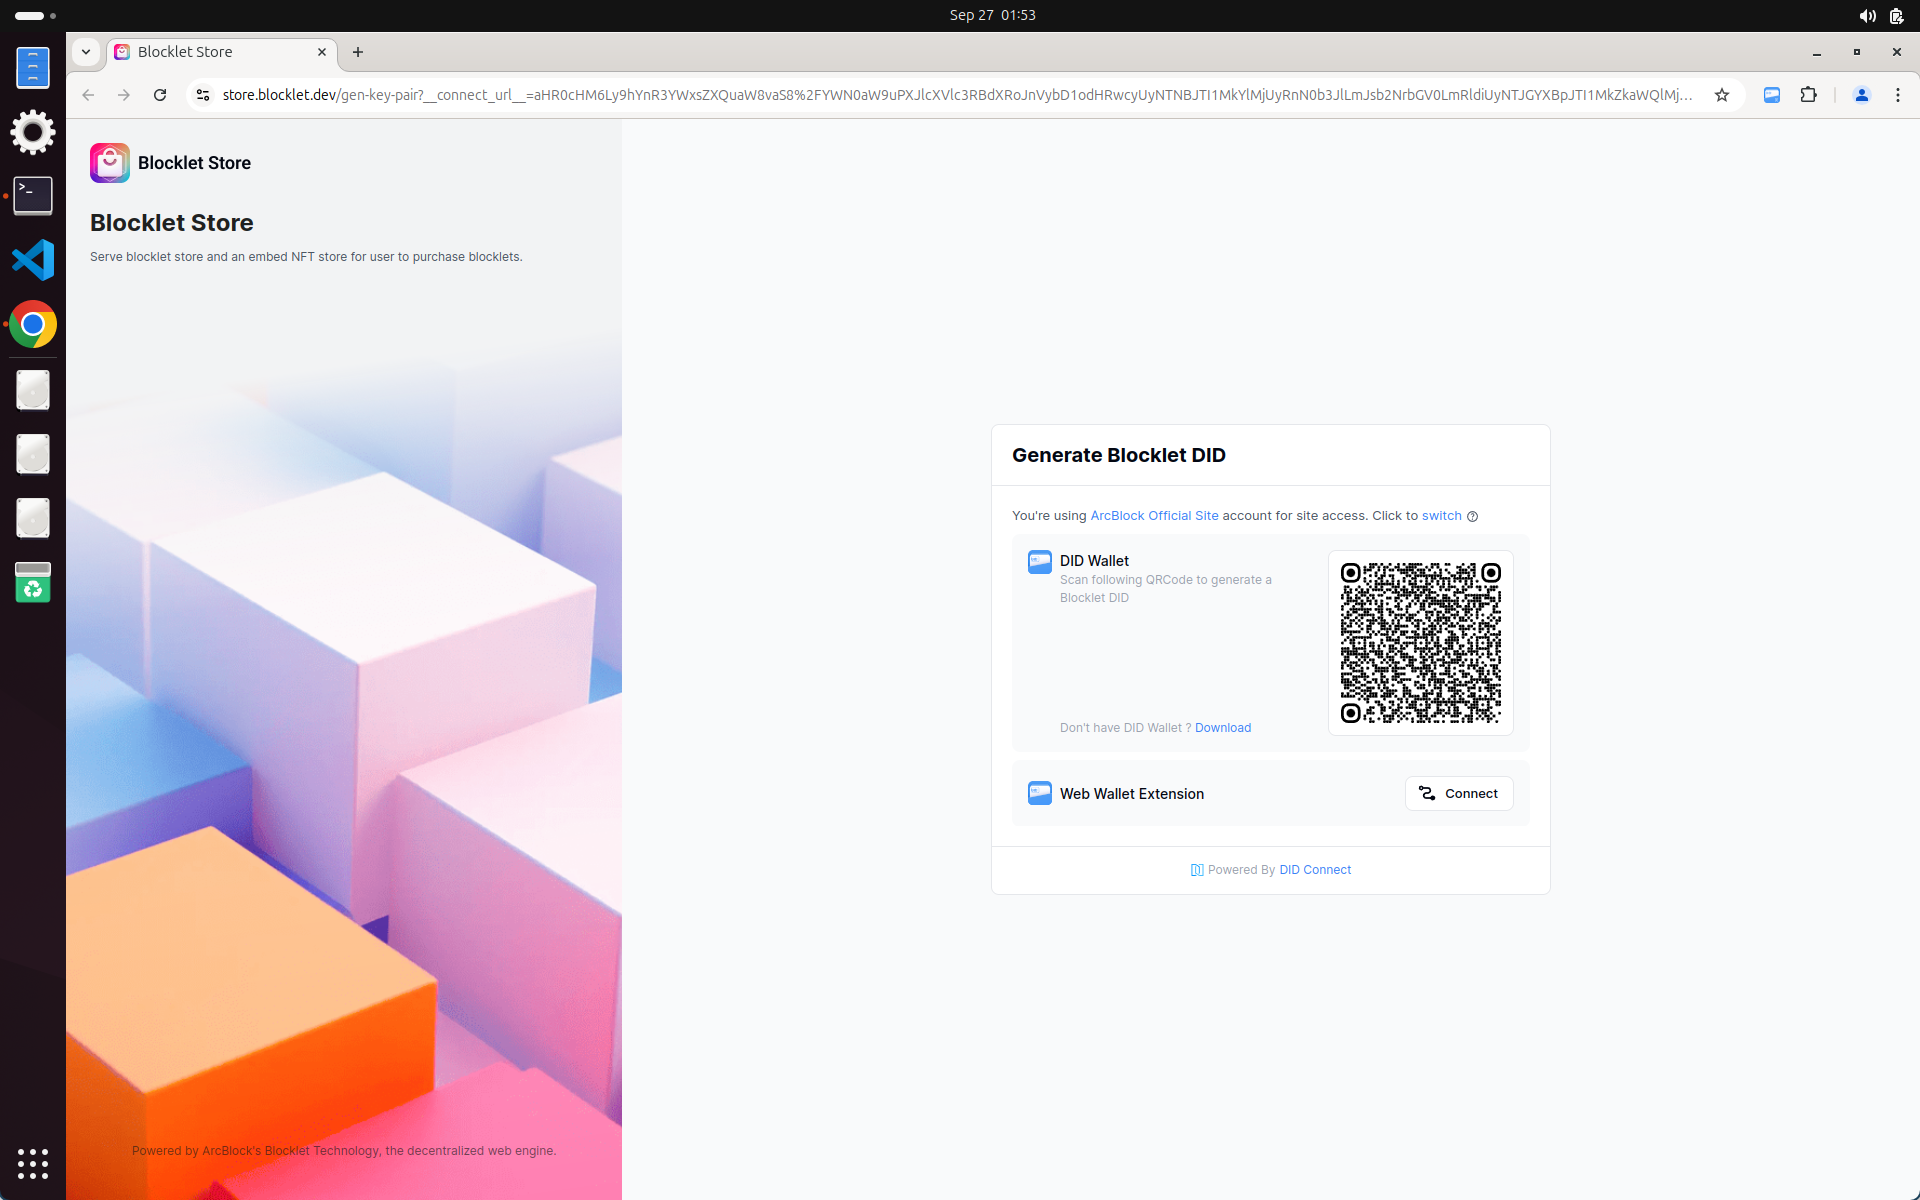
Create a Blocklet#
- Just use
blocklet createcommand to create a template blocklet - Follow the link to generate an app DID, finish DID Connect in the browser
- Install project dependencies
Develop Blocklet#
- Use
blocklet devcommand to start blocklet development - Open the URL displayed in the terminal, you will see a DID Connect playground page
- Modify the code in the src folder and you will see the change on the page
Follow the video
Understanding DID Connect#
DID Connect is a bridge between DID Wallet and Blocklet, with DID Connect, Blocklet can easily get data (eg: User Profile, NFT, etc...) from DID Wallet
Follow the next steps to add DID Connect on your own Blocklet
1. Add DID Connect request in the front-end project
Full code
import Avatar from '@arcblock/ux/lib/Avatar';
import { useLocaleContext } from '@arcblock/ux/lib/Locale/context';
import AccountBoxOutline from '@iconify-icons/material-symbols/account-box-outline';
import CakeOutlineRoundedIcon from '@iconify-icons/material-symbols/cake-outline-rounded';
import MailOutlineRoundedIcon from '@iconify-icons/material-symbols/mail-outline-rounded';
import PhoneOutlineRoundedIcon from '@iconify-icons/material-symbols/phone-android-outline-rounded';
import { Icon } from '@iconify/react';
import { useState } from 'react';

import { useSessionContext } from '../../libs/session';
import ConnectItem from '../connect-item';
import InfoRow from '../info-row';

export default function RequestProfile() {
  const [result, setResult] = useState(null);
  const { locale, t } = useLocaleContext();
  const { connectApi } = useSessionContext();

  const requestProfile = () => {
    const action = 'request-profile';
    setResult(null);
    connectApi.open({
      locale,
      action,
      onSuccess(res) {
        if (res.result.avatar) {
          res.result.avatar = res.result.avatar.replace(/[\r\n\s]/g, '');
        }
        setResult(res.result);
      },
      messages: {
        title: t('claims.requestProfile.connect.title'),
        scan: t('claims.requestProfile.connect.scan'),
      },
    });
  };

  return (
    <ConnectItem
      title={t('claims.requestProfile.title')}
      description={t('claims.requestProfile.description')}
      onClick={requestProfile}
      result={
        result ? (
          <>
            <Avatar variant="circle" src={result.avatar} did={result.did} size={60} />
            <InfoRow
              icon={<Icon fontSize={18} icon={AccountBoxOutline} />}
              name={t('claims.requestProfile.result.fullName')}
              value={result.fullName}
            />
            <InfoRow
              icon={<Icon fontSize={18} icon={MailOutlineRoundedIcon} />}
              name={t('claims.requestProfile.result.email')}
              value={result.email}
            />
            <InfoRow
              icon={<Icon fontSize={18} icon={PhoneOutlineRoundedIcon} />}
              name={t('claims.requestProfile.result.phone')}
              value={result.phone}
            />
            <InfoRow
              icon={<Icon fontSize={18} icon={CakeOutlineRoundedIcon} />}
              name={t('claims.requestProfile.result.birthday')}
              value={result.birthday}
            />
          </>
        ) : null
      }
    />
  );
}- Just use
connectApi.opento start a DID Connect process
- Just use
2. Add DID Connect handler in the back-end project
Full code
const omit = require('lodash/omit');
const logger = require('../../libs/logger');
const action = 'request-profile';
module.exports = {
action,
onConnect() {
return {
profile: () => ({
description: 'Please provide your full profile',
fields: ['fullName', 'email', 'phone', 'signature', 'avatar', 'birthday'],
}),
};
},
onAuth: ({ userDid, userPk, claims, updateSession }) => {
const claim = claims.find((x) => x.type === 'profile');
logger.log(`${action}.onAuth`, { userDid, userPk, claim });
updateSession({
result: {
...omit(claim, ['type', 'signature']),
did: userDid,
pk: userPk,
},
});
},
};View full DID Connect docs in here
Video
Deploy Blocklet on local Blocklet Server#
- Create a Blocklet container first, copy the Blocklet container DID
- Change
deployscript inpackage.json "deploy": "npm run bundle && blocklet deploy .blocklet/bundle"->"deploy": "npm run bundle && blocklet deploy .blocklet/bundle --app-id=xxxxxxx"
- execute
npm run deploy - check the full document here
View video
Publish Blocklet to Test Blocklet Store#
You can complete the application's build and deployment publishing according to the following steps:
- Bump version:
npm run bump-version - Bundle:
npm run bundle - Upload blocklet to Test Store:
blocklet upload
Or you can directly use npm run upload to skip bundle and blocklet upload (Step2-3)
- Publish on store
Project Ideas#
Here are some interesting and useful application ideas for your reference, but of course you can completely follow your ideas:
- Decentralized DocuSign: Develop a decentralized document signing platform similar to DocuSign that utilizes decentralized identifiers (DID) and DID-Connect for user authentication and generates verifiable credentials for each signed contract. This platform will provide a secure and transparent way to manage contractual agreements in a digital format.
- Decentralized Crowdsourcing App: Create a decentralized application for managing crowdsourcing projects that allows users to propose, fund, and manage community projects transparently. This platform will use blockchain technology to handle fund allocation, project milestones, and distributions, ensuring accountability and trust among participants.
References#
For any questions or support, visit the ArcBlock Community Hackathon Support board or consult the ArcBlock Developer Documentation. Good luck with your DID Wallet Dapp development!