The DID Connect Workflow
A DID Connect session is a standardized, secure interaction between your application, our server-side SDK, and the user's DID Wallet. Understanding this flow is key to effectively implementing and debugging your integration. This guide breaks down the entire process, from the moment a user initiates a connection to the final handling of their response.
For more information on the concept, you can visit the official website: https://www.didconnect.io
The core components involved are:
- Your Application (DApp): The web application that the user is interacting with.
- did-connect-js (Server): The Node.js library running on your server that orchestrates the session.
- DID Wallet: The user's mobile or web-based wallet that manages their digital identity and responds to requests.
High-Level Overview#
At a high level, the application requests the user to prove control of their identity and optionally provide some information. The user's wallet facilitates this by signing and verifying messages, ensuring a secure and user-centric data exchange.
The following diagram illustrates the typical interaction sequence:
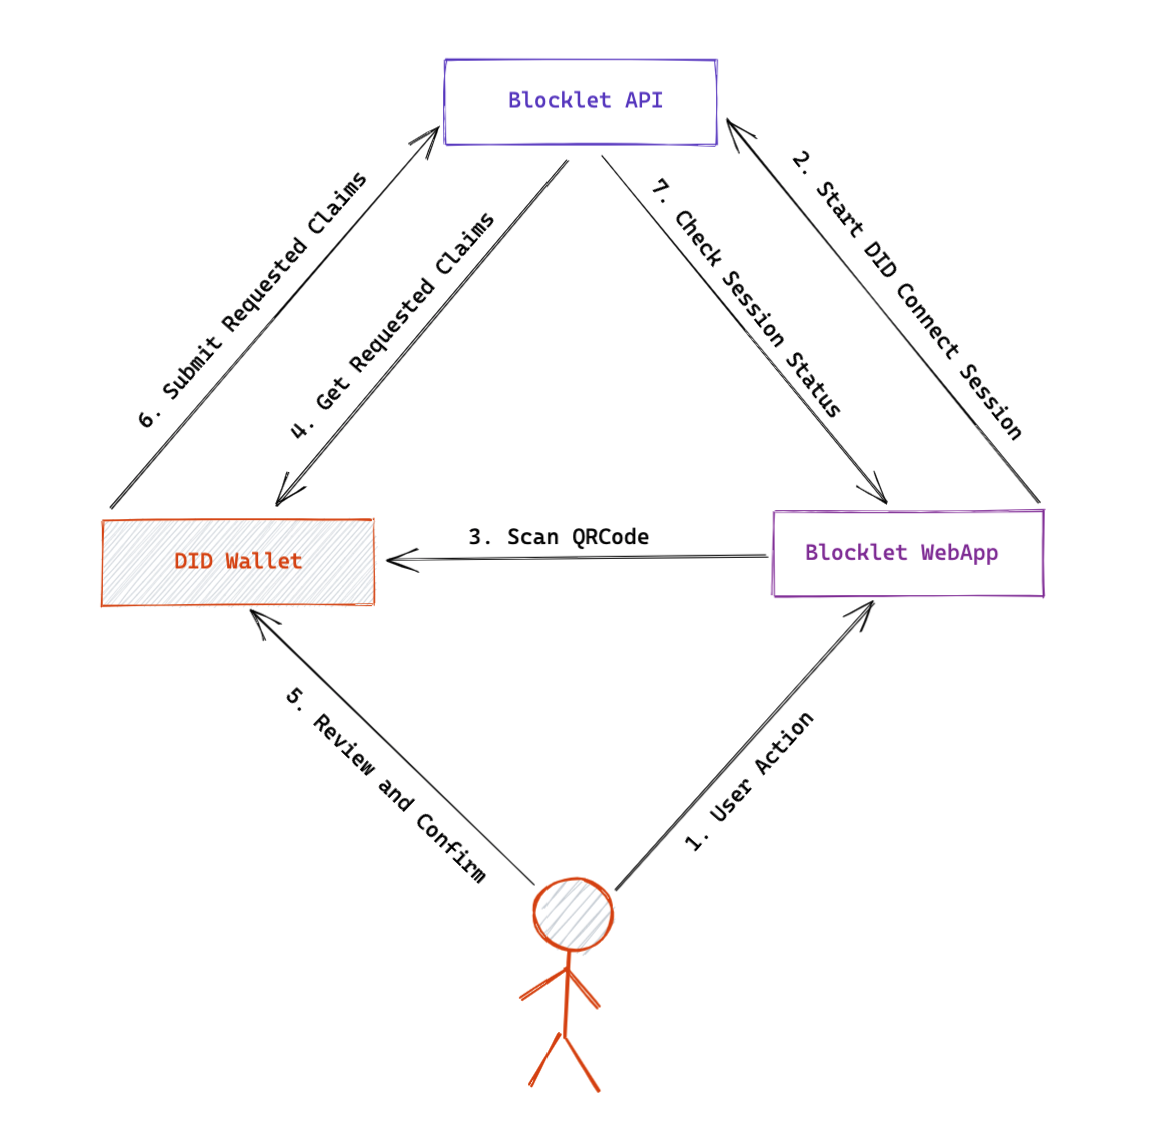
Step-by-Step Breakdown#
Let's dive into the technical sequence of events. The process is designed to be stateless from the server's perspective, with session state managed by a token storage mechanism.

1. Session Initiation#
The user clicks a "Connect Wallet" button in your application. The frontend makes an API call to your server's endpoint (e.g., GET /api/did/login/token). The generateSession handler creates a new session token and a unique DID Connect URL.
2. QR Code Display#
Your server returns the token and url to the frontend. The frontend displays the url as a QR code and begins polling a status endpoint (e.g., GET /api/did/login/status?_t_=[token]) to wait for the session to complete.
3. Wallet Scans and Fetches Request#
The user scans the QR code with their DID Wallet. The wallet follows the encoded URL, making a request to the authentication endpoint on your server (e.g., GET /api/did/login/auth). When your server's onAuthRequest handler receives this request, it marks the session status as scanned and returns the first signed claim request, which is typically an authPrincipal claim asking the user to connect.
4. User Approval#
The wallet verifies the signature on the claim request and presents it to the user. The user can then choose to approve or decline the connection.
5. Wallet Submits Response#
Upon approval, the wallet signs a response containing the user's DID and public key and POSTs it back to the same authentication endpoint. If the user declines, a declineAuth message is sent instead.
6. Server Processing and Claim Chain#
Your server's onAuthResponse handler verifies the user's signed response.
- The
onConnectcallback is triggered. Here, you can run logic based on the user's DID or define dynamic claims. - If there are subsequent claims (like requesting a profile), the server signs and sends the next claim request to the wallet. This cycle repeats until all claims are fulfilled.
- Once all claims are processed, the
onAuthcallback is triggered with the final set of user-provided data.
7. Session Completion#
After the onAuth callback completes successfully, the server updates the session status to succeed. The frontend, which has been polling for status, receives this update and can now redirect the user or update the UI to reflect the logged-in state. Finally, the onComplete callback is fired on the server for any cleanup tasks.
Summary#
The DID Connect workflow is a secure, multi-step handshake that ensures user consent and data integrity. While the SDK handles the cryptographic details, understanding this sequence is crucial for structuring your application logic around the various lifecycle callbacks.
To learn more about what you can ask the user for, proceed to the Requesting Claims guide. For details on how to process the data returned by the wallet, see Handling Wallet Responses.